Thursday, July 31, 2008

Short cut RUN prompt or Commends prompt keys

I know there are a lot of people who love using the RUN prompt or the COMMAND prompt rather than using the MMC control. Here are some of the short cut command for your regular use.

  • Add/Remove Programs : appwiz.cpl
  • Automatic Updates : wuaucpl.cpl
  • Date and Time Properties : timedate.cpl
  • Display Properties : control desktop
  • Display Properties : desk.cpl
  • Findfast : findfast.cpl
  • Shuts Down Windows : shutdown
  • Task Manager : taskmgr
  • Wordpad : write

Use the shortcuts!!!

Thursday, July 24, 2008

Convert string data into DataTime in Sql Server

In SQL Server, no direct funtion to convert interger string into time format. We need to do it by our own logic. See the below sample which convert integer string to datetime.


DECLARE

@DateTimeValue varchar(30),

@DateValue char(8),

@TimeValue char(6)


SELECT

@DateValue = '20080723',

@TimeValue = '211957'


SELECT @DateTimeValue =

convert(varchar, convert(datetime, @DateValue), 111)

+ ' ' + substring(@TimeValue, 1, 2)

+ ':' + substring(@TimeValue, 3, 2)

+ ':' + substring(@TimeValue, 5, 2)


SELECT

DateInput = @DateValue,

TimeInput = @TimeValue,

DateTimeOutput = @DateTimeValue

Use this tips!!!

Monday, July 21, 2008

Visual Studio 2005 / 2008 short cut keys

Visual Studio 2005/2008 short cut keys
Using keyboard shortcuts is the best way to get things done faster in Visual Studio. Below are my favorite Visual Studio keyboard shortcuts.
  • F12 : Go to definition of a variable, object, or function.
  • SHIFT+F12 : Find all references of a function or variable.
  • CTRL+ALT+L : View Solution Explorer. I use Auto Hide for all of my tool windows to maximize screen real estate. Whenever I need to open the Solution Explorer, it’s just a shortcut away.
  • CTRL+M, O: Collapse to Definitions. This is usually the first thing I do when opening up a new class.
  • CTRL+-: Go back to the previous location in the navigation history.
  • ALT+B, B: Build Solution.
  • ALT+B, U : Build selected Project
  • ALT+B, R : Rebuild Solution
  • CTRL+ALT+Down Arrow : Show dropdown of currently open files. Type the first few letters of the file you want to select.
  • CTRL+K, CTRL+D : Format code.
  • CTRL+L : Delete entire line.

Use the technology!!!

Saturday, July 19, 2008

Delegates in .NET

What is a Delegate?
We can say delegates are a .NET object which points to a method that matches its specific signature or delegates are function pointers that point to function of matching signatures.

Function pointers which are extensively used in c/c++ to points to a function holds only the memory address of the function, it doesn’t carry further information about the function parameters, return type etc.

In other words delegates are function pointers that point to function of matching signatures. Function pointers which are extensively used in c/c++ to points to a function holds only the memory address of the function, it doesn’t carry further information about the function parameters, return type etc.

In .NET framework has introduced a type-safe mechanism called delegates, with automatic verification of the signature by the compiler. So the delegates are type-safe, object oriented, secure .NET objects which can be used to invoke methods of matching signature.

While using delegates it is very necessary to make sure that the functions which the delegates points has the same number of argument type and same return type.

For example
if we have a method that takes a single string as a parameter and another method that takes two string parameters, then we need to have two separate delegate type for each method.

Types of Delegate
Delegates are of two types. They are
  • Single cast delegate
  • Multicast Delegates

Single cast delegate

A delegate is called single cast delegate if it invokes a single method. Its derive from the System.Delegate class. See the below sample :

using System;

namespace Delegates
{
public delegate int DelegateToMethod(int x, int y);

public class Math
{
public static int Add(int first, int second)
{
return first + second;
}

public static int Multiply(int first, int second)
{
return first * second;
}
}

public class DelegateApp
{
public static void Main()
{
DelegateToMethod aDelegate = new DelegateToMethod(Math.Add);
DelegateToMethod mDelegate = new DelegateToMethod(Math.Multiply);
Console.WriteLine("Calling the method Math.Add() through the aDelegate object");
Console.WriteLine(aDelegate(5,5));
Console.WriteLine("Calling the method Math.Multiply() through the mDelegate object");
Console.WriteLine(mDelegate(5,5));
Console.ReadLine();
}

}
}

The output for above sample is

Calling the method Math.Add() through the aDelegate object
10
Calling the method Math.Multiply() through the mDelegate object
25

Multicast delegate

A multicast delegate is an object that maintains a linked list of delegates. Invoking the delegate invokes each delegate in the same order that it has been added to the linked list.

For an example

we have created an object (a delegate) called multiDelegate of type Math.DelegateToMethod and assigned a null value to this object. The next, assigns a new delegate object that encapsulates the method math.Add(). Using the operator += we assign more delegate objects (thus creating a multicast delegate) to the delegate multiDelegate.

It invoking the delegate invokes all the delegates maintained in its linked list, which in turn calls the encapsulated methods.

See the below sample :


using System;

namespace Delegates
{
public class Math
{
// note that the delegate now is a nested type of the Math class
public delegate void DelegateToMethod(int x, int y);

public void Add(int first, int second)
{
Console.WriteLine("The method Add() returns {0}", first + second);
}

public void Multiply(int first, int second)
{
Console.WriteLine("The method Multiply() returns {0}", first * second);
}

public void Divide(int first, int second)
{
Console.WriteLine("The method Divide() returns {0}", first / second);
}
}

public class DelegateApp
{
public static void Main()
{
Math math = new Math();
Math.DelegateToMethod multiDelegate = null;
multiDelegate = new Math.DelegateToMethod(math.Add);
multiDelegate += new Math.DelegateToMethod(math.Multiply);
multiDelegate += new Math.DelegateToMethod(math.Divide);
multiDelegate(5,5);
Console.ReadLine();
}
}
}


The output of the above sample is

The method Add() returns 10
The method Multiply() returns 25
The method Divide() returns 1

The statement multiDelegate(5,5); is similar to our previous example in which we have created three delegate objects and then calling each of them separately.

You can remove a delegate object from the linked list using the operator -=.

Where are Delegates used?
The most common example of using delegates is in events. You define a method that contains code for performing various tasks when an event (such as a mouse click) takes place.
This method needs to be invoked by the runtime when the event occurs. Hence this method, that you defined, is passed as a parameter to a delegate.

Happy coding!!!

Monday, July 14, 2008

Convert DataTable to DataView in C# in VS 2008

The following sample will demonstrate the convertion from DataTable to DataView in C# in VS 2008.

In VS 2008, DataView having one method which accept datatable as input parameter and it return the converted result as dataview by using DataView().

// Create dynamic data table.
var dataTable = new DataTable();


// Create columns
dataTable.Columns.Add("FirstName");
dataTable.Columns.Add("LastName");
dataTable.Columns.Add("Salary");


var dataRow = dataTable.NewRow();
dataRow[0] = "Kannan";
dataRow[1] = "Arjun";
dataRow[2] = 1000;


// Add new Datarow to data table.
dataTable.Rows.Add(dataRow);


dataRow = dataTable.NewRow();
dataRow[0] = "Seema";
dataRow[1] = "Sekar";
dataRow[2] = 4000;


// Add new Datarow to data table.
dataTable.Rows.Add(dataRow);


// Convert data table to dataview.
var dataView = new DataView(dataTable);
// Now ready to use this dataview.


Happy coding!!!

ValidateRequest in Page directive in asp.net

ASP.NET 2.0 validates form input values for potentially dangerous entries such as the '<' and '>' characters. When I enter the value '<' and '>' in textbox in .Net web form, it returns an error like 'Sys.WebForms.PageRequestManagerServerErrorException: An unkown erroroccured while processing the request on the server. The status code returned from the server was: 500'. So I search on google indicates the below solution for this :
  • Add ValidateRequest = "false" in the Page directive.
    <%@ Page Language="vb" AutoEventWireup="false" Codebehind="sample.aspx.cs"
    Inherits="KannanDemo.sample" validateRequest="false"%>
    After added it and run the application. This time I got the error like The 'ValidateRequest' attribute is not supported by the 'Page directive.'

  • Then I found another way to solve this issue by adding <pages ValidateRequest="false"/> in System.Web of the Web.Config file. I got the result.

Note:

The main disadvantage of setting the ValidateRequest to false on a page is the openning of an opportunity to hack your page, because the ValidateRequest's job is to ensure that the most common injection attacks are not possible for your page, and so if you disable it then you should start making all the necessary changes to avoid SQL Injection, Script Injection, and so on.

Happy coding!!!

Saturday, July 12, 2008

Convert IEnumerable to DataTable in C#

Convert IEnumerable to DataTable in C#

In LINQ, there is no option to casting IEnumerable to DataTable. We need to convert manually. For this, I have created one healper class which convert any type of IEnumerable to DataTable. Use the code below for this kind of requirements.

using System;

using System.Data;

using System.Configuration;

using System.Linq;

using System.Web;

using System.Web.Security;

using System.Web.UI;

using System.Web.UI.HtmlControls;

using System.Web.UI.WebControls;

using System.Web.UI.WebControls.WebParts;

using System.Xml.Linq;

using System.Reflection;


namespace KannanDotNetReference.HelperClasses

{

static public class ConvertDataTable

{

public static DataTable ConvertToDataTable<T>(this System.Collections.Generic.IEnumerable<T> varList, CreateRowDelegate<T> fn)

{

DataTable dataTable = new DataTable();


// Variable for column names.

PropertyInfo[] tableColumns = null;


// To check whether more than one elements there in varList.

foreach (T rec in varList)

{

// Use reflection to get column names, to create table.

if (tableColumns == null)

{

tableColumns = ((Type)rec.GetType()).GetProperties();

foreach (PropertyInfo pi in tableColumns)

{

Type columnType = pi.PropertyType;

if ((columnType.IsGenericType) && (columnType.GetGenericTypeDefinition() == typeof(Nullable<>)))

{

columnType = columnType.GetGenericArguments()[0];

}

dataTable.Columns.Add(new DataColumn(pi.Name, columnType));

}

}


// Copying the IEnumerable value to DataRow and then added into DataTable.

DataRow dataRow = dataTable.NewRow();

foreach (PropertyInfo pi in tableColumns)

{

dataRow[pi.Name] = pi.GetValue(rec, null) == null ? DBNull.Value : pi.GetValue(rec, null);

}

dataTable.Rows.Add(dataRow);

}

return (dataTable);

}


public delegate object[] CreateRowDelegate<T>(T t);

}

}


See the below sample which fetch all the country with their customers count from Northwind database by using LINQ.
I have created Sample.aspx with one gridview control for displaying the result. See the code below: Sample.aspx

<%@ Page Language="C#" AutoEventWireup="true" CodeBehind="Sample.aspx.cs" Inherits="KannanDotNetReference.Sample" %>

<!DOCTYPE html PUBLIC "-//W3C//DTD XHTML 1.0 Transitional//EN" "http://www.w3.org/TR/xhtml1/DTD/xhtml1-transitional.dtd">

<html xmlns="http://www.w3.org/1999/xhtml" >
<head runat="server">
<title>Kannan Samples : IEnumerabl to DataTable convertor</title>
</head>
<body>
<form id="form1" runat="server">
<div>
<asp:GridView ID="GridView1" runat="server">
</asp:GridView>
</div>
</form>
</body>
</html>

See the sample.aspx.cs code below which fetch the data from Northwind by using LINQ technique. In the code GetCountry() method is using ConvertToDataTable() helper method for converting IEnumerable result to datable. See the complete codeing of Sample.aspx.cs :


using System;

using System.Collections;

using System.Configuration;

using System.Data;

using System.Linq;

using System.Web;

using System.Web.Security;

using System.Web.UI;

using System.Web.UI.HtmlControls;

using System.Web.UI.WebControls;

using System.Web.UI.WebControls.WebParts;

using System.Xml.Linq;

using KannanDotNetReference.HelperClasses;


namespace KannanDotNetReference

{

public partial class Sample : System.Web.UI.Page

{

protected void Page_Load(object sender, EventArgs e)

{

GridView1.DataSource = GetCountry();

GridView1.DataBind();

}


private DataTable GetCountry()

{

var db = new NorthwindDataContext();

var table = db.KannanGetCountry();


DataTable dt = table.ConvertToDataTable(record => new object[] { table });


return dt;

}

}

}


Once we finished our coding part, next run this application. See the result below.


Note:

I have created one stored procedure for fetching the country with number of customers belongs to by using the below code:


CREATE PROCEDURE [dbo].[KannanGetCountry]
AS
SELECT
Country as 'CountryName',
COUNT(CustomerId) as 'CountryCount'
FROM Customers
GROUP BY Country

Happy Coding!!!

Adding Northwind Pub Database to SQL Server 2005

SQL Server 2005 doesn't include the Pubs and Northwind databases.

  • You can click here to download (.msi) the latest version of Pub and Northwind sample databases .
  • Install .msi file. It will create binary files (.mdf , .ldf) and SQL scripts (.sql) files.

Installing sample databases from the Management Studio GUI:

  • This method will use binary files.
  • Copy .mdf and .ldf files back to SQL DATA folder like c:\Program Files\Microsoft SQL Server\MSSQL.1\MSSQL\DATA\. This path varies somewhat depending how many instances of SQL Server you have on your machine.
  • Open SQL Server 2005.
  • Right-click the root database
  • Click "Attach"
  • Click the "Add" button and choose the *.mdf file from the \Data folder
  • Click OK

Installing sample databases from the command line:

  • This method will use SQL scripts files.
  • Click the "New Query" toolbar button
  • Cut and paste the contents of the instnwnd.sql or instpubs.sql scripts in the query window
  • Hit F5 button to run.

Use the technology!!!

Wednesday, July 9, 2008

Open Enterprise Manager using keyboard shortcut

To open enterprise manager in SQL Server 2000 using keyboard shortcut: Microsoft Management Console (MMC)
  • Start menu, Run, type "mmc"
  • In the file menu, recent file list select "SQL Server Enterprise Manager.msc"

If list is not there then try this one

  • Select Start - Run.
  • At the Open prompt enter: mmc
  • Click OK
  • Select File - Add/Remove Snap-in...
  • Click Add...
  • Select Microsoft SQL Enterprise Manager
  • Click Add, then Close
  • Click Ok to return to the mmc.
  • Select File - Save As...
  • Delete or rename the original (offending) file out the way.
  • Save the new msc file as C:\Program Files\Microsoft SQL Server\80\Tools\BINN\SQL Server Enterprise Manager.MSC

or

  • In the start menu, Microsoft SQL Server, Enterprise Manager, right click on the menu, select properties
  • It will open properties for the shortcut
  • In the shortcut key, specify whatever shortcut key-combination you want.
For more information click here .

Use the technology!!!

Job scheduler in SQL Server 2000

Job scheduler in SQL Server 2000

To create a SQL job scheduler in Sql Server 2000 and run it automatically in a particular interval. For this, we need to follow the steps given below:

  1. First we create one test database called 'KannanOrganization' in Sql Server 2000.
  2. Then we create one test table namely 'Employee' with the following table schema.
    Table Name : Employee

    -----------------------------------------------------------------------

    Column Name DataType Width Dec Allow Null

    ------------------------------------------------------------------------
    Id INT 4 No, PK , Identity

    FirstName VARCHAR 50 Yes
    LastName VARCHAR 50 Yes
    Salary DECIMAL 8 0 Yes
    ------------------------------------------------------------------------

    See the below snaps for more information.


  3. Then we need to create one store procedure for auto Sql Jjob test. For a sample, here I created one stored procedure called, 'InsertEmplyee' for testing SQL job.
    CREATE PROCEDURE [dbo].[InsertEmployee]
    AS
    INSERT Employee
    (FirstName, LastName, Salary)
    VALUES
    ('Kannan', 'Arjun', 17658.50)
    GO


    Now stored procedure is ready to use.


  4. Next we need to create a job scheduler. First we select Management ---> SQL Server Agent --> Job from Sql server you connected currently. See the snaps for clear picture.

  5. Right click and select the New Job from the from Job options. It will open New Job Property window. Fill the relavent information in this window. Like this snaps,


  6. Next, we goto Step tab and select New button from it. It will open New Job Step window. Fill the query type, database, stored procedure information like the below snaps.


    Step Name - Name of the Step. We may use multiple step in single job.
    Type - Select the type of the query to be executed. In out case, 'TSQL'
    Database - Select your database. Here for testing select 'KannanOrganization'.
    Commend - fields is going to execute our stored procedure.

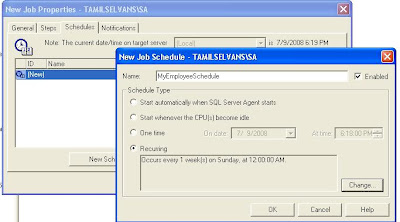
  7. Once we finished our Step tab works then we go for Scheduler setting in Schduler tab.
    Here it providing 4 verities of scheduler for our job running. We can select the type which you want. For my case, I need to run my job on every 1 mins. So that I can select option number 4 Recurring.

    For date and time setting, select Change button in the same tab. It will open another window for our date and time settings. See the snaps below.


  8. Once we fixed our date and time setting, click ok button. It will create our job successfully. Now the time to start our job manully by right click the job we created and select Start Job option from that. See the snaps.

  9. After running our job, we see the job result by open out Employee table and see the records inserted. See the snaps.


    It will run and insert the record at every 1 mins. In the same way we can do our requirement.

Use the technology!!!

Publishing Web Site in asp.net 2.0

Publishing Web Site in asp.net 2.0

Compilation and Publishing in ASP.NET 2.0 is completely different than in ASP.NET 1.1. In ASP.NET 1.1, whether you debugged the code or ran it from a server, all of the .cs files were compiled into a single dll and the markup (.aspx and .ascx) remained seperate. This could often lead to problems if you declared a control in the markup but then didn't have a coresponding reference in the .cs file. All of this has changed.

When you click Build Web Site, it doesnt compile all of the .cs files into a single dll. It only validates that the code is syntactically correct. It will validate the .cs files as well as the .aspx and .ascx files.

When you run it through the debugger or you use xcopy deployment directly against the files in your web project, it uses dynamic compilation to run the web site. This means that if you change a .cs file, the next time that file is hit in a web browser, it will compile it on the fly.

So when you want to deploy the web site, you click Publish Web Site. You can also do this using the new aspnet_compiler.exe and point it to a solution file.

The Publish Web Site dialog will prompt you for a location. This can be a file path, a web site address, or ftp site. It also has three different checkbok options:

  1. Allow this precompiled site to be updatable
  2. Use fixed naming and single page assemblies
  3. Enable strong naming on precompiled assemblies

1. Allow this precompiled site to be updatable

The Allow this precompiled site to be update option when checked leaves all of the .aspx and .ascx files alone. This way they can be changed by an external tool. When it is unchecked, it compiles the entire site including .aspx and .ascx files into a single dll or multiple dlls.

When you publish with this option, we get the following in bin folder under published folder.

  1. .compile file and the corresponding file should be placed for each update of a given aspx, master file and if there is only change is code-behind class, this file should be included too.
  2. For code change in App_Code, no need to copy App_Code.compiled, just copy App_Code.
  3. For code change in Global.asax, no need to copy App_global.asax.compiled, just copy App_global.asax.dll.
  4. For changes in CSS files of App_themes CSS should be copied manually.

2. Use fixed naming and single page assemblies

For deploying assemblies of a ASP.NET 2.0 projects there are three ways to do:

  1. Single page assembly
  2. Batch assembly
  3. Merged assembly

The filename format for a particular dll will be App_web_<filename>.<random four byte hex string>.dll. . So the filename for the default control would look like this, App_web_default.ascx.2ce8cdef.dll. The random four byte hex string is supposedly the same every time you compile. It also seems to use the same string at each directory level. When unchecked there is no guarantee what the filenames will be in the dlls and entire directories will be grouped into the same dlls.

Single page assembly

In Visual Studio 2005, for a ASP.NET 2.0 web application, we can deploy separate assemblies for each pages of the site! This can be done by enabling the above option.

If the 'Allow this precompiled site to be updatable' is disabled, that means a corresponding .compile file should also be deployed with the assembly of each page. In this case, if there is any change in the page, we need not to deploy the updated .compile file in the web, as all contents are placed in the dll, but as the resource locator or for the basic rule, Atlas one version of .compile file should be placed in the bin directory of the deployment site.

Any way, no matter, whether the change has been done in content or code, the page dll MUST be deployed! For a change in content, if only .compiled is provided, there is no error, but change will not take effect!

Batch assembly

For different type of contents and codes, different sets of assemblies will be generated, if we make the above option false. So any change in the code of a page, requires the corresponding set of assemblies to be deployed.

The Use fixed naming and single page assemblies option tells the compiler to use the same names for the dlls it creates every time it compiles. It also will make the compiler create seperate dlls for every page and control on the site. This will allow for indiviudal controls to be updated without affecting any of the other ones.

For batch assembly, each dll includes a encrypted key in it's name and for separate web publishing, there are separate keys for the same type of contents, thus separate file name for the newer version.

Merged assembly

All of the coding contents can be embeded to a single assembly, like VS 2003 age, using a VS add-in named 'aspnet_merge.exe' provided by Microsoft. Unfortunately, this tool is not provided by default and should be downloaded and installed separately.

3.Enable strong naming on precompiled assemblies

Enable Strong Naming on Precompiled Assemblies is basically the same as specifynig a key in the assemblyinfo.cs in ASP.NET 1.1.

Depends on the requirement and necessity we can choose any of the method given above.

Use the technology!!!


Sunday, July 6, 2008

Join Operators in LINQ

Join Operators in LINQ

There are two join operators: Join and GroupJoin. Join and GroupJoin provide an alternative strategy to Select and SelectMany.

1. Join

The Join operator performs an inner join, emitting a flat output sequence. The SQL equivalents of JOIN is INNER JOIN .

For a sample, conside the people and roles objects below and see how to fetch the data from both the objects using JOIN.


List people = new List {
{ ID = 1, LastName = "Kannan", FirstName= "Arjun", RoleId = 1},
{ ID = 2, LastName = "Heema", FirstName ="Sekar", RoleId = 2}
{ ID = 3, LastName = "Seema", FirstName ="Sekar", RoleId = 2}
{ ID = 4, LastName = "Jillary", FirstName ="Sekar", RoleId = 3}
};

List roles = new List {
{ ID = 1, RoleDescription = "Manager" },
{ ID = 2, RoleDescription = "Team Leaeder" },
{ ID = 3, RoleDescription = "Developer" }
};

var query = from p in people
join r in roles on p.RoleId equals r.ID
select new { p.FirstName, p.LastName, r.RoleDescription };

ObjectDumper.Write(query);


The output is
    LastName = Kannan  FirstName = Arjun  RoleDescription = Manager
LastName = Heema FirstName = Sekar RoleDescription = Team Leaeder
LastName = Seema FirstName = Sekar RoleDescription = Team Leaeder
LastName = Jillary FirstName = Sekar RoleDescription = Developer
2. GroupJoin

GroupJoin does the same work as Join, but instead of yielding a flat result, it yields a hierarchical result, grouped by each outer element. It also allows left outer joins. The SQL equivlant are INNER JOIN, LEFT OUTER JOIN .

The comprehension syntax for GroupJoin is the same for Join, but it is followed by the into keyword.

For an example, take the same object initialized above with little changes. Now we will see how to use Group JOIN.

List people = new List {
{ ID = 1, LastName = "Kannan", FirstName= "Arjun", RoleId = 1},
{ ID = 2, LastName = "Heema", FirstName ="Sekar", RoleId = 2}
{ ID = 3, LastName = "Seema", FirstName ="Sekar", RoleId = 2}
{ ID = 4, LastName = "Jillary", FirstName ="Sekar", RoleId = 4}
};

List roles = new List {
{ ID = 1, RoleDescription = "Manager" },
{ ID = 2, RoleDescription = "Team Leaeder" },
{ ID = 3, RoleDescription = "Developer" }
};

var query = from p in people
join r in roles on p.RoleId equals r.ID into pr
from r in pr.DefaultIfEmpty()
select new {
p.FirstName,
p.LastName,
RoleDescription = r == null ? "No Role" : r.RoleDescription
};


The output is
    LastName = Kannan  FirstName = Arjun  RoleDescription = Manager
LastName = Heema FirstName = Sekar RoleDescription = Team Leaeder
LastName = Seema FirstName = Sekar RoleDescription = Team Leaeder
LastName = Jillary FirstName = Sekar RoleDescription = No Role

In the code above, the join … into query expression is used to group the join into a new sequence called pr. Since the new element we introduced in the people sequence has a role identifier that doesn’t correspond to any of Role elements in the roles sequence, an empty element is returned.
In role description, the RoleId 4 is undefined so that the we need to pass 'No Role' as result.

Using the DefaultIfEmpty method, we can replace each empty element with the given ones. In this case no parameter has been provided, so the empty element will be replaced with a null value. By checking this value in the select command we can provide a custom description ("No Role" in our case) when the code encounters null elements.

Note:

  • The advantage of Join and GroupJoin is that they execute efficiently over local in-memory collections because they first load the inner sequence into a keyed lookup, avoiding the need to repeatedly enumerate over every inner element.
  • The disadvantage is that they offer the equivalent of inner and left outer joins only; cross joins and non-equi joins must still be done with Select /SelectMany. With LINQ to SQL queries, Join and GroupJoin offer no real benefits over Select and SelectMany.

Click here to see more operator available in LINQ.

Happy coding!!!

Saturday, July 5, 2008

Projection Operators in LINQ

Projection Operators in LINQ

There are two Projection Operators in LINQ namly 'Select' and 'SelectMany'.

1. Select :

Just like SELECT in SQL, the Select operator specifies which elements are to be retrieved. The record or data retrival based on two models. One is element based selection and another one is Index based selection.

public void KannanLINQDemo() {
int[] digits = { 1, 5, 6, 2, 0 };
string[] strings = { "zero", "one", "two", "three", "four", "five", "six", "seven", "eight", "nine" };


var textNums = from n in digits
select strings[n];

Console.WriteLine("Digit strings:");
foreach (var s in textNums) {
Console.WriteLine(s);
}
}

The output is
           one
five
six
two
zero

Let we see one more sample with different select usage. To select the people whose Role is 2 and their last name starts with the letter 'H' from the following people lists.

List people = new List {               
{ ID = 1, LastName = "Kannan", FirstName= "Arjun", RoleId = 1},
{ ID = 2, LastName = "Heema", FirstName ="Sekar", RoleId = 2}
{ ID = 3, LastName = "Seema", FirstName ="Sekar", RoleId = 2}
{ ID = 4, LastName = "Jillary", FirstName ="Sekar", RoleId = 3}
};
var query = from p in people
where p.RoleId == 2 && p.LastName.StartWith("H")
select p;
ObjectDumper.Write(query);


The output is
    ID = 2, LastName = Heema, FirstName =Sekar, RoleId = 2

2. SelectMany

Transforms each input element, then flattens and concatenates the resultant subsequences . SelectMany concatenates subsequences into a single flat output sequence. SelectMany can be used to expand child sequences, flatten nested collections, and join two collections into a flat output sequence. The SQL equivalents of SelectMany is INNER JOIN, LEFT OUTER JOIN, CROSS JOIN .

For an example, take the above people object and let we take the following roles objects.

List roles = new List {
{ ID = 1, RoleDescription = "Manager" },
{ ID = 2, RoleDescription = "Team Leader" }
{ ID = 3, RoleDescription = "Developer" }

};
To select the first people's Firstname, LastName and their role description from the above objects. The solution is
var query = people
.Where(p => p.ID == 1)
.SelectMany(p => roles
.Where(r => r.ID == p.ID)
.Select(r => new { p.FirstName,
p.LastName,
r.RoleDescription}
)
);
The output is
LastName = Kannan FirstName= Arjun RoleDescription = Manager

Click here to see more operator available in LINQ.

Happy coding!!!

Restriction Operators in LINQ

Restriction Operator in LINQ

There is only one restriction operator in LINQ is 'Where'. One of the most used LINQ operators is Where. It restricts the sequence returned by a query based on a predicate provided as an argument.

The following code snippet uses Where to retrieve every element in a sequence that has FirstName equal to Arjun. In this samples we use Object Initilizer concept to create an people object. We can use this Where in two way.

  1. Element based retrival from the source sequence
  2. Position (index) based retrival from the source sequence
First we will see the element based retrival from the source sequence from the people object given below:


List people = new List {
{ ID = 1, LastName = "Kannan", FirstName= "Arjun", Role = 1},
{ ID = 2, LastName = "Heema", FirstName ="Sekar", Role = 2}
};

var query = from p in people
where p.FirstName == "Sekar"
select p;
ObjectDumper.Write(query);


The index based data retrival from the source squenece is given below the same sample given above. Here, index based retrival using Lamda expression for data fetching.

var query = people
.Where((p, index) => p.Role == index && p.Role = 2);
ObjectDumper.Write(query);


The output for above two samples are same as below.

         ID = 2, LastName = "Heema", FirstName ="Sekar", Role = 2

Click here to see more operator available in LINQ.

Happy coding!!!

Standard Query Operators in LINQ

Standard Query Operators in LINQ

LINQ provides an API known as standard query operators (SQOs) to support the kinds of operations we’re commonly used to in SQL. You’ve already used C#’s select and where keywords, which map to LINQ’s Select and Where SQOs—which, like all SQOs, are actually methods of the System.Query.Sequence static class.

In LINQ many SQOs are avilable whose all are grouped into 14 categories. They are listed below and click the list below to see the more details.
  1. Restriction Operator
  2. Projection Operators
  3. Join Operators
  4. Grouping Operator
  5. Ordering Operators
  6. Aggregate Operators
  7. Partitioning Operators
  8. Concatenation Operator
  9. Element Operators
  10. Generation Operators
  11. Quantifier Operators
  12. Equality Operator
  13. Set Operators
  14. Conversion Operators

Happy Programming!!!

Friday, July 4, 2008

Building blocks and Data sources of LINQ - Part 3

Building blocks and Data sources of LINQ - Part 3

In the last few posts, I coverted few C# 3.0 features namly Object initialization Expressions, Extension Methods and Lamda Expressions and Expression Trees. In this post, I will cover the concept of Anonymous Types and Implicitly Typed Local Variables in details.

5. Anonymous Type

An anonymous type is a type that is declared without an identifer. You can use object initalizers without specifying the class that will be created with the 'new' operator. The compiler creates the anonymous type at compile time and not run time. Anonymous types are particularly useful when querying and transforming/projecting/shaping data with LINQ

let's we take an example of an Employee class with three properties namly Name, Salary and EmpId and see how we declare and instantiate an anonymous type for Employee class,

var employee = new { Name = "Arjun", Salary = 3000.5, EmpId=339 };

At compile time, the compiler creates a new (anonymous) type with properties inferred from the object initializer. Hence, the new type will have the properties Name, Salary and EmpId.

The Get and Set methods, as well as the corresponding private variables to hold these properties, are generated automatically. At run time, an instance of this type is created and the properties of this instance are set to the values specified in the object initializer.

It converts the above code in the background as below


class __Anonymous1
{
private string name ;
private decimal salary;
private int empId;

public string Name{ get { return name; } set { name = value ; } }
public decimal Salary{ get { return salary; } set { salary= value ; } }
public int EmpId{ get { return empId; } set { empId= value ; } }
}

__Anonymous1 employee = new __Anonymous1();
employee .Name = "Arjun";
employee .Salary =3000.5;
employee .EmpId =339;

Let we another sample with multiple Anonymous type declaration.

var Customer = new{
Company = "Photon Company",
Name = "Arjun",
EmpId = 339,
Contacts = new {
Phone = "(044)3141231",
Email = "abc@mail.com" }
};

Notice the Contacts member which is another anonymous type nested inside the first type. Without anonymous types, LINQ would not be able to create types dynamically. This is what allows LINQ to query for an arbitrary set of data, without first having the structure declared.

5. Implicitly Typed Local Variables

A new keyword, 'var', has been added to C#. When the compiler sees it, it implicitly defines the type of the variable based on the type of expression that initializes the variable.

Let we see how its working in the following samples,

var i = 5; // is equivalent to int i = 5;

var s = "this is a string"; // is equivalent to string s = "this is a string";

An implicitly typed local variable must have an initializer. For example, the following declaration is invalid:

var s; // wrong definition, no initializer.

Note :

  • As you can imagine, implicit typing is really useful for complex query results because it eliminates the need to define a custom type for each result.
  • Implicitly typed local variables cannot be used as method parameters.

Happy Coding!!!


Wednesday, July 2, 2008

Building blocks and Data sources of LINQ - Part 2

Building blocks and Data sources of LINQ - Part 2

In the previous post, I coverted two new C# 3.0 features namly Object initialization Expressions and Extension Methods. In this post, I will cover the concept of Lamda Expressions and Expression Trees.

3.Lamda Expressions

This feature simplifies coding delegates and anonymous methods. Lambda expressions allow us to write functions that can be passed as arguments to methods. All lambda expressions use the lambda operator =>, which is read as "goes to".

Lamda Expression can also optionally postpone code generation by creating an expression tree that allows further manipulation before code is actully generated, which happens at execution time.

For an example, we could create a simple Person class. Fetch the person records based start letter in LastName using Lamda Expression.

    public class Person

{

public string FirstName { get; set; }

public string LastName { get; set; }

public int Age { get; set; }

}


public class MyLamdaExpression

{

public List GetPeople(string startLetter)

{

var people = new List

{

new Person {FirstName = "Kannan", LastName = "Arjun", Age = 20},

new Person {FirstName = "Rangoli", LastName = "A", Age = 53},

new Person {FirstName = "Seema", LastName = "Sekar", Age = 15},

new Person {FirstName = "Satya", LastName = "Saravanan", Age = 16}

};


var results = people.Where(p => p.LastName.StartsWith(startLetter));

return (List) results;

}

}


If we call this mehtod like GetPeople("A"), this will return the follwoing outputs:

Arjun
A

For an another example, suppose we have an array with 10 digits in it, and you want to filter for all digits greater than 5. In this case, you can use the Where extension method, passing a lambda expression as an argument to the Where method:

int[] source = new[] { 3, 8, 4, 6, 1, 7, 9, 2, 4, 8 };

foreach (int i in source.Where(x => x > 5))
Console.WriteLine(i);

The advantage of lambda expressions is that they give you the ability to perform expression analysis using expression trees.

4.Expressions Trees

Expression trees are nothing but those which represent the query itself. It is very important to understand that lambda expressions are always directly compiled into IL code by the compiler, so a lambda expression is a representation of a unit of executable code, it is not a data structure. See the picture given below for an easy understands, LINQ can treat lambda expressions as data at run time. The type Expression represents an expression tree that can be evaluated and changed at run time. It is an in-memory hierarchical data representation where each tree node is part of the entire query expression.

There will be nodes representing the conditions, the left and right part of the expression, and so on.

For an example, consider the following very simple lambda expression:

Func<int,int,int> function = (a,b) => a + b;

The variable function points at raw executable code that knows how to add two numbers. The lambda expression shown in above is a short hand way of writing the following method:

public int function(int a, int b)
{
return a + b;
}

One can call either the method shown above, or the lambda expression like this:

int c = function(3, 5);

After the function is called, the variable c will be set equal to 3 + 5, which is 8.

class Program {
static void Main(string[] args) {
Expression<Func> expression = (a, b) => a + b;
Console.WriteLine(expression);
}
}

The delegate type Func shown above in the declaration found is declared for us in the System namespace:

public delegate TResult Func<t1,t2,result>(T1 arg1, T2 arg2);

This code looks complicated, but it is used here to help us declare the variable function, which is set equal to a very simple lambda expression that adds two numbers together. Even if you don't understand delegates and generic functions, it should still be clear that this is a way of declaring a variable that references executable code. In this case it points at very simple executable code.


If you are using the code shown above, set a breakpoint on the WriteLine statement and run the program. Hover your mouse under the variable expression you may seen the expression tree like this,

and ExpressionTreeVisualizer is the new visualization feature avilable in VS 2008.. It can be used to visualize an expression tree.

Translating Code into Data
In the previous section, you saw how to declare a variable that points at raw executable code. Expression trees are not executable code, they are a form of data structure. So how does one translate the raw code found in an expression into an expression tree? How does one translate code into data?

LINQ provides a simple syntax for translating code into a data structure called an expression tree. The first step is to add a using statement to introduce the Linq.Expressions namespace: using System.Linq.Expressions;

Now we can create an expression tree:

Expression<func> expression= (a,b) > a + b;

The identical lambda expression shown in the previous example is converted into an expression tree declared to be of type Expression. The identifier expression is not executable code; it is a data structure called an expression tree.

In the next post we will see the concept of Anonymous Types and Implicitly Typed Local Variables in details.

Happy programming!!!

Building blocks and Data sources of LINQ - Part 1

Building blocks and Data sources of LINQ - Part 1

The LINQ foundation consists of a set of building blocks including query operators, query expressions, and expression trees, which allow the LINQ toolset to be extensible.

You can plug a wide array of data sources into LINQ, including

  • File System
  • Active Directory
  • WMI
  • Windows Event Log
  • Any other Data Source or API

Microsoft already offers more LINQ providers

  • LINQ to Objects is an API that provides methods that represent a set of standard query operators (SQOs) to retrieve data from any object whose class implements the IEnumerable<T> interface. These queries are performed against in-memory data.

  • LINQ to ADO augments SQOs to work against relational data. It is composed of three parts

    • LINQ to SQL : (formerly DLinq) is use to query relational databases such as Microsoft SQL Server.

    • LINQ to DataSet :supports queries by using ADO.NET data sets and data tables.

    • LINQ to Entities : (formerly XLinq) is a Microsoft ORM solution, allowing developers to use Entities to declaratively specify the structure of business objects and use LINQ to query them.

  • LINQ to XML (formerly XLinq) not only augments SQOs but also includes a host of XMLspecific features for XML document creation and queries.

Let we see all the concept given above one by one with an example.

Part 1 : LINQ To Objects

LINQ to Objects can be used with any class that implements the IEnumerable interface. This part will covers the concepts of C# 3.0 new concepts first and then will see how it utilize LINQ,

  1. Object initialization Expressions
  2. Extension Methods
  3. Lamda Expressions
  4. Expression Trees.
  5. Anonymous Types
  6. Implicitly Typed Local Variables

Let’s look at one by one how it works.

1. Object initialization Expressions

Just like an array initializer, an object initialization expression allows us to initialize a new object without calling its constructor and without setting its properties.

           // The standard object creation and initialization
Person p1 = new Person();
p1. FirstName = "Kannan";
p1.LastName = "Arjun";
ObjectDumper.Write(p1);

// The object initialization expression
Person p2 = new Person { FirstName="Kannan", LastName ="Arjun" };
ObjectDumper.Write(p2);


With object initialization expressions you can create an object directly and set its properties using just one statement.

2. Extension Methods

As the name implies, extension methods extend existing .NET types with new methods. Like as obj.ToString(), here ToString() is system function will convert the value as string. In the same way, we can also create our custom function in the name of Extension Method.

For an example 1, by using extension methods with a string, it’s possible to add a new method that converts every space in a string to an underscore(_).

        public static string SpaceToUnderscore(this string source)
{
char[] cArray = source.ToCharArray();
string result = null;
foreach (char c in cArray)
{
if (Char.IsWhiteSpace(c))
result += "_";
else
result += c;
}
return result;
}


Here you define an extension method, SpaceToUnderscore(). To specify an extension method you insert the keyword 'this' before the
first method parameter, which indicates to the compiler the type you want to extend. Note that the method and its class must be static. You can use SpaceToUnderscore() just like any other string method.

Suppose we call this method in the code behinds as given below,

var newstring = "This is kannan test".SpaceToUnderscore() +","+ "Arjun Test".SpaceToUnderscore();

The result of executing this method will return like this,

This_is_kannan_test,Arjun_Test

For an example, to convert a decimal value into string formatted with a specific culture by using extension methods.
In C# 2.0, we can write the custome method for the above case as follows
static class DateFormat
{
public static void Demo()
{
DateTime today = DateTime.Now;
Console.WriteLine(MyLongDateFormat(today));
Console.WriteLine(MyShortDateFormat(today));
}

public static string MyLongDateFormat(DateTime date)
{
return String.Format(date.ToString("U"));
}

public static string MyShortDateFormat(DateTime date)
{
return String.Format(date.ToString("d"));
}
}

After running this sample, we get two different date format as output like this
Thursday, July 03, 2008 1:46:08 AM
7/3/2008

In the above sample we are created two differnet method called MyLongDateFormat() and MyShortDateFormat(). Suppose we need to use this method in some other class, we need to call with full signature.

Now we see how to write the same situation in Extension method.

static class DateFormat
{
public static void Demo()
{
DateTime today = DateTime.Now;
Console.WriteLine(today.MyLongDateFormat());
Console.WriteLine(today.MyShortDateFormat());
}

public static string MyLongDateFormat(this DateTime date)
{
return String.Format(date.ToString("U"));
}

public static string MyShortDateFormat(this DateTime date)
{
return String.Format(date.ToString("d"));
}
}


The output should be the same one what we had in previous sample.


Thursday, July 03, 2008 1:46:08 AM
7/3/2008


Note :

  • Simply by adding the new System.Query namespace, you can use LINQ with any type that implements IEnumerable<t>.
  • If you have an extension method and an instance method with the same signature, priority is given to the instance method.
  • Properties, events, and operators are not extendable

Let we see the rest of the concepts given above in the next post.

    Happy programming!!!

Tuesday, July 1, 2008

How to insert data through stored procedure in LINQ


My last post describes how to create and fetch the data through stored procedure in LINQ. In this post, we will see how to insert the new data to the table, update or modify the existing information and delete the exisiting records through stored procedure in LINQ.

Step 1 : Insert the data via stored procedure.

  1. First we should create DataContext classes for accessing the database. Click here to see how to create DataContext classes. Already, I have created 'KannanBlogDemo' datacontext classes for this demonstration.
  2. Create 'InsertPatientInformation' stored procedure in sql server and drag and drop it into 'KannanBlogDemo.dbml' file.

  1. Once we created our DataContext classes, then add the new .aspx file into the application. For example,
    Insert.aspx
  2. Add one grid view control into the Insert.aspx page.
  3. In the Insert.aspx.cs file, add the following statements under the Page_Load events. In this, first we create an PatientInformation object and assign all the values. Then, call the InsertPatientInformation stored procedure and pass the appropriate value in it. After that, we can fetch all the values including the newly inserted. For a change, we will select the particular fields from PatientInformation objects.
            protected void Page_Load(object sender, EventArgs e)
    {
    var db = new KannanBlogDemoDataContext();
    PatientInformation patientInformation = new PatientInformation();

    patientInformation.LastName = "demo Last Name";
    patientInformation.FirstName = "demo First Name";
    patientInformation.DOB = Convert.ToDateTime("12/12/2000");
    patientInformation.State = "Demo State";
    patientInformation.City = "Demo City";
    patientInformation.MRN = "1234567890";
    patientInformation.FacilityId = 3;
    patientInformation.PrimaryLanguageId = 1;
    patientInformation.Amount = 1000;

    // Call Insert stored procedure.
    db.InsertPatientInformation(patientInformation.LastName, patientInformation.FirstName,
    patientInformation.DOB, patientInformation.City, patientInformation.State,
    patientInformation.FacilityId.ToString(), patientInformation.PrimaryLanguageId,
    patientInformation.MRN, patientInformation.Amount);
    db.SubmitChanges();

    // View all the record with selected fields.
    var patient = db.SelectAllPatinetInformation();
    GridView1.DataSource = from p in patient
    select new
    {
    p.FirstName,
    p.LastName,
    p.FacilityName,
    p.PrimaryLanguageName,
    p.Amount
    };
    GridView1.DataBind();
    }

  4. Here, SubmitChanges() is the method which saves our changes in the DataContext.
  5. Now in Insert.aspx, add alternative row color in gridview. Like as,
           <asp:GridView ID="GridView1" runat="server">
    <AlternatingRowStyle BackColor="#E9E9E9" />
    </asp:GridView>
  6. All the setting are over, now we can run the application and see the result as below.
Happy codings!!!